Bohemian Blended Bench
I created this look over a series of LIVE videos on facebook and Instagram but have summarised the steps I took to achieve this blended bohemian look.
This blog may contain affiliate links. If you choose to purchase through the link I earn a small amount at no extra cost to yourself. This helps me get paid for creating content like this blog. Thank you for supporting my small business.
Shop the full range of Dixie Belle products here or in the individual links below
Product list:

Here's the 'before' shot of this bench. I love all the carved detail and it's not something I get my hands on everyday so I really wanted to wait until inspiration hit before I made a start!
I am hugely influenced by a company Ian Snow. They sell bohemian furniture which is fair trade and hand painted in beautiful colour palettes. I thought I would do my take of an 'Ian Snow' style piece but with a Faff Designs spin!

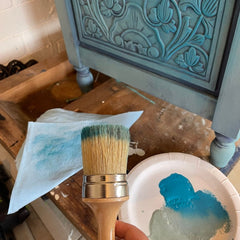
Once I had cleaned the bench with White Lighting, I scuff sanded with a RAD pad sanding sponge - these are really flexible and allowed me to get into the carved details. I then applied a base coat of Yankee Blue. I added small touches of In the Navy and Bunker Hill Blue in areas - this doesn't really show up in the final outcome but I didn't want a flat colour with this piece and these touches added some tonal variation to my base coat.

Once the case coat had dried, I then added a coat of Vintage Duck Egg with a synthetic brush. I intentionally left some of the Yankee Blue base coat in the recessed areas. I also added a small amount of Peacock with a separate synthetic brush...

...and blended the two colours together whilst on the bench. I worked in small areas to avoid the Vintage Duck Egg from drying before I added Peacock. This way of colour mixing, as opposed to mixing them in a tub then applying, gives more tonal variation rather than one flat colour. I have pockets where the Peacock is more prominent and other places where the Vintage Duck Egg is more apparent.

This is the effect so far.

Next I applied a colour wash of Yankee Blue over the entire piece. A colour wash is just paint which has been watered down. I worked in small areas at a time and applied the paint using a synthetic brush making sure it was sitting in all the deeper parts of the carvings. I've included a sped up video to show the technique!

Then I wiped back the wash of paint to only leave it in the deeper areas of the carvings. I used this in a similar way that you may see a glaze being applied. Typically glazes are used to give dimension to a piece and that is the effect I wanted to achieve but with a colour wash instead.
I then did some dry brushing with Peacock and Vintage Duck Egg. Dry brushing does the opposite of a glaze or colour wash. A glaze will sit in recesses and deeper areas where dry brushing is designed to highlight raised or decorative detailing. If you use both techniques together it gives beautiful dimension.
I used The Best Dang Brush for the dry brushing as it has a large, flat surface area which is perfect for dry brushing (if you use a small brush it can access the detailed areas and the aim is to skim over the raised carved detail). I added some paint to the dry brush and rubbed almost all of it off onto a paper towel. This may seem daft but the aim is to have as little paint on your brush as possible. If I pressed my brush onto my hand, very little paint, if any would rub off. If you use too much paint, it just gloops on and doesn't look good at all. It's a very subtle way of adding dimension and can be buildable - just don't try and be impatient and too much paint on in one go! Another short video below!
You need a very light hand and just pass the brush over the high areas until you have the coverage you require. It can be as subtle as you want!

After layers and what seemed like hours of dry brushing, I used the Satin Clear Coat to seal the paint work and give protection to it. I applied with a synthetic brush so that I could get into all the detail.

Once the Clear Coat had been dry overnight, I used some Best Dang Wax in White applied with a French Tip brush to soften the colours and pull the piece together.
Below is the outcome and I have to say this is one of my personal favourites - I wish I had room to keep it! I hope you like it too!
Con x


Leave a comment